New Cars, New Overpass

I’ve rambled about assembling a big mess of car kits in the last couple posts here and here, and I’ve mentioned something about assembling a Rix Rural Timber Overpass kit.  Here’s the manufacturer’s photo of that structure:

RIX Timber Overpass

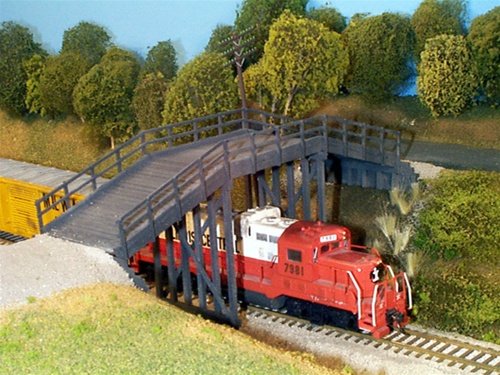
I’ve finished building the kit and it is waiting for paint.  I’ve also been working on the supporting benchwork for the bridge and I’m close to fitting it into it’s final resting spot.  The section of mainline where this will reside is just a bit west of Willis.  I’m hoping to catch the feel of the Canadian National (formerly Illinois Central) mainline in south Brookhaven, Mississippi.  There the mainline enters a stretch where it’s running in a cut in the terrain.  At the middle of this stretch is an old timber roadway overpass, not unlike the Rix kit.  The prototype bridge is a bit longer than the model, as it crosses what was once a double mainline, but the kit still captures the flavor of the structure.  I’ve always liked that bridge and hope to make this one of the signature scenes on the layout.

As for the car kits, I’ve slowed down a bit on that.  I’ve completed about 30 kits, which sounds like quite a few, but is small relative to the number of kits remaining (something approaching 300).

I’ve got all the material on hand to commence conversion work on all those code 70 Shinohara switches.  I’ve just got to muster up the motivation to get started with all those re-buildings (one of the few things that I don’t particularly want to do).  Unfortunately, the local folks around here haven’t recognized that this is potentially one of the next great model railroads.  As such, no one is beating a path to the door for the chance to become involved in its construction (a sorry state of affairs).

biggrin

Oh, I’d like to acknowledge the superior customer service that I’ve received from Accurail.  While assembling a large stack of their kits, I came across a couple that had significantly rusted up screws (used for attaching the trucks and draft gear box covers).  I contacted Accurail and they immediately sent replacement screws . . . not the eight that I’d requested, but a bag of 100.  Within a few days of my initial contact, I had product in hand.  Now that’s service!  And those extra screws have come in handy for some of the older kits.  Those older kits utilize a molded pin on the draft gear box cover which holds the cover on by friction.  I’ve modified several of these kits by cutting off the pin and drilling a hole at that location.  I then used a screw to attach the cover, greatly increasing accessibility in the event maintenance is required.

As always, comments are welcome and visits are allowed (just drop a line).

-Jack

Cloudy Weather on the Louisiana Central

As you local folks know, this weekend has seen the end of the “mini-drought” that we’ve been having.  Friday afternoon saw the weather beginning to change over the Louisiana Central as well.  Late in the day several clouds started appearing on the horizon over near Whitcomb, and by Saturday afternoon the entire railroad was under cloudy skies.

Yes friends, the layout construction has officially started!  And it started by getting the clouds painted onto the backdrop.  I used old fashioned “rattle” spray cans along with the cloud stencils provided by New London Industries.  Here are a couple closeup photos to whet your appetite.

Photo of Clouds - View 1Photo of Clouds - View 2Photo of Clouds - View 3

In a week or so I’ll get several larger photos uploaded to the web site for your perusal (Edit:  they’re there now).  I tried to capture typical Louisiana weather on a summer afternoon, with bands of clouds popping up on the horizon and then rapidly moving over the area (where you’re at, naturally) as an afternoon thunderstorm.

It’s hard to see in these small photos, but there is a faint line near the bottom of each picture.  That line is roughly at track level.  Much (probably most) of that bottom layer of clouds will end up behind trees, buildings and other scenic features.  But where there is a wee gap in the landscape, I want the clouds to show through.

Next up is benchwork.  I’ll likely get a start on that next weekend.

-Jack

Practice Clouds

Well, today I got a little more cloud painting practice in.  I had talked about my initial efforts a few weeks ago in the post Navigating the Roadblocks.  In that exercise, I had used white “rattle can” spray paint with modest success.  Today I fired up my new Paasche spray gun and put it through its paces.

The results were disastrous!

I was using acrylic craft paint for the test.  The paint was spraying with a very course pattern.  I tried about four different paint consistencies, from virtually un-thinned, to very watery.  With each consistency, I tried several different pressures, from about 15 psi all the way up to 40 psi.  Generally, the higher the pressure, the better the result, though none of my results were satisfactory.  At the higher pressures, the atomization of the paint improved, but the volume of paint became too great.  Also, the thicker the paint, the better result I achieved.  Problem is, I wanted a very light, translucent effect for the clouds to help imply distance at the low horizon (based on my observations of clouds these past weeks).  If I need a denser cloud, I can simply use multiple passes of the spray gun.  But I found that spraying a heavy bodied mixture at high pressure (giving an almost acceptable result) just put down too much paint in a single pass.

With this disappointing result, I decided to spray another panel using a recently purchased (therefore, fresh) can of white spray paint.  The results were much better.  No spatter like I had experienced in my first panels a few weeks ago.  The spray can (surprisingly) had a much finer spray pattern and I found it easier to control the paint volume.

Conclusion:  I will not be using the spray gun for the layout backdrop.

One of the primary reasons I had  purchased the spray gun was so I could mix some darker shades of blue and gray for cloud bottom accents.  I’m disappointed that I’ve only been able to find flat colors of spray can paint in white, black and gray primer.  Yes, I know that you can get those tiny little cans of Testors model paint in more colors, but it would cost a fortune in paint if I elected to use those little 3 ounce spray cans.

So, I’m going to buy another spray can of white and one of gray primer tomorrow, and I’m going to shoot another panel or two during my July 4th holiday.  Hopefully I’ll get a satisfactory result which I can then use on the backdrop in the train room.

In the meantime, I’ll be offering my spray gun up for sale.  Despite the course spray pattern, it does fine if one intends to actually put a solid coat of paint on an object (I tested it in a small area, and it did fine in that capacity).

Photo of Paasche Model 62-2-3 Paint Spray Gun

It’s a Paasche 62-2-3 spray gun, and it retails for $49.00.  I’ll let it go for half of that.  If you or someone you know might be interested, please drop me a line.

-Jack