A Control Panel Mock-up

I’ve been rolling ideas for control panels around in my head for several years now.  I’ve reached a point where I need to make a decision as to the style and construction I’m going to employ.  This past weekend I decided to mock up one of those panel ideas and here is the result.

Control Panel Mockup

This panel is a recessed version.  I think that this will help maximize the aisle width and also keep folks from accidentally rubbing up against the controls.  This panel is 5″ x 8″ and is typical of the size many of the panels will be.  I temporarily attached a section of Masonite to the edge of the benchwork, then cut the rough hole out for the panel.  Using 1″ x 1″ material, I “framed” the backside of the Masonite for the panel.  Using a router, I trimmed the Masonite flush with the frame, then screwed the panel to the back of it.

The panel itself is a sandwich of 1/8″ thick Masonite, a drawing, and some .093″ thick acrylic plastic.  I’ve used that method for panels in the past and they worked out well for me.

The “ghost” objects on the panel are merely reflections.  They seemed pronounced in the photo, but aren’t really noticed in person.

Opinions anyone?

-Jack

A Bit o’ Work, a Bit o’ Fun

A few weeks ago I posted an update of layout construction progress and I mentioned several activities scheduled for this month.  So, starting with the first of those scheduled activities, I attended the (3rd annual) Train Day at the Library in Baton Rouge.  This years show surpassed last years (which had surpassed the first year).  Forrest Becht and the folks who are involved in planning and hosting the show are really listening to the feedback provided by the visitors and have made the appropriate changes to reflect that.  As a result, (in my opinion) the show has enjoyed considerable improvement in the few short years of its existence.  Now this isn’t a large show, but rather a small gathering at a local library.  There is a large and very nice photo exhibition of railroad subjects, tables and cases of models are displayed, and several local and regional organizations have a presence with plenty of hand-out literature.  There are on-going slide shows throughout the day, and several small operating train layouts (three rail and some N scale).  It’s fun and it’s free.  Can’t beat that.

Next week Ron Findley and I are heading over to Hattiesburg, Mississippi for the annual banquet of the Mississippi Great Southern Chapter of the NRHS.  Their banquet is always well attended, with lots of displays, sales tables, a good speaker and plenty of great food.  I’m looking forward to that.

Layout activity: I’ve completed the refurbishing and wiring up of 25 Tortoise switch motors and have even installed the first one.  I need to install 18 more to get all the switches presently installed operational.  I also completed the hard-wired aspects of my cab bus (throttle bus).  I ended up relocating the DCC command station to the middle booster location since this was electrically central to the layout.  This has reduced my longest cab bus run by nearly half.  As I add fascia to the layout, along with throttle plug-in points, I will only have to daisy-chain from point to point using pre-made data cables…nice and clean.

I should be getting back to benchwork and trackage this spring.  I haven’t done any of that since last October and I’m anxious to get back to it.  I haven’t added any new photos to the main website since early January since all I’ve been doing has either been done on the workbench or beneath the layout.  However the photos on the site do show the latest in the benchwork progression.

If you’re interested in coming by for a visit, just drop a line and we’ll set it up.

-Jack

Another Electrical Adventure

As I’ve mentioned before, electrical things usually come fairly easy to me.  However sometimes those little electrons do their best to stymie me, as I illustrated in another post.  This past week I ran into another of those little gremlins.

We’ve had a lot of rain these past few weeks, so I thought it would be a good opportunity to catch up with the under table electrical work.  I had put in a good bit of trackage over in Monterey, which included the turning wye.  It all had to be connected electrically, so I crawled under the layout and started connecting about a jillion track feeders.

When I initially started my track installation and wiring, I kept a small battery/buzzer device connected to the track which would sound the alarm if I happened to connect something in a way it didn’t like.  However, once I installed my PSX circuit breakers (CB boards), I would get a constant alarm as the device would back-feed through the CB board circuitry.  So, being lazy, I unclipped the device from the track rather than disconnect the main feeds from the circuit breaker.  I was quite careful though, and all my wiring is color coded, so I didn’t anticipate any problems.

Well, I suppose I should have anticipated them because when the wiring was completed and the power was flipped on, the fault light on the CB board lit up with complaint.  Arrghhh!

The last trackage installed had been the wye.  So back under the layout I went, disconnecting track feeders one at a time, starting from the far end.  After all the wye feeders were disconnected, the fault light remained on.  So I started disconnecting the rest of the feeders to the mainline, and yard trackage.  I disconnected every feeder and the light kept glowing.  Now what?  The problem had to be in the track itself.  So I disconnected the CB board and started poking around with my little buzzer device.  I eventually determined that the problem was somewhere in the wye trackage.

One tail track of that wye crosses the mainline utilizing a Walthers/Shinohara 90 degree crossing.  The crossing itself had been a big concern initially because during manufacture it had apparently been removed from the injection mold prematurely and was significantly warped.  I contacted Walthers for a replacement but they had none in stock, and had no ETA for new inventory.  Checking around quite a few mail order shops, I was unable to locate one.  It tested out OK electrically, and I could press it down flat to the table against it’s will, so I decided to go ahead and try using it.  I stuck it down with adhesive caulk and soldered the connecting tracks to it, and this seemed to tame it.

With that background, I strongly suspected that the crossing might be the culprit.  So I held my breath and sliced through one of the rails between the crossing and the wye switch.  I figured that would at least tell me whether the problem was in the wye trackage, or in the crossing.  The buzzer informed me that the problem was in the wye.  Rats!  So I figured I needed to start isolating the switches.  With great difficulty, I managed to slide the rail joiners of the first switch until they contacted a tie.  But they wouldn’t slide quite far enough for me to lift out the switch.  So I carefully cut down through the rail joint and rail joiner on each rail.  Still no joy.  In the meantime Wayne had come over and after looking things over, was just as puzzled as I.

I just stood there leaning on the layout, wondering just what in the world was happening here.  Then I had the epiphany.  One of the three switches and it’s tail track comprise the turning section of the wye, i.e. the reversing section.  It is necessary to gap all four rails of that switch to isolate it from the other wye trackage.  I had dutifully sliced through these rails and filled the gaps with bits of styrene, filed and shaped to the rail contour.  My realization was that I had probably sliced through the rails on the wrong side of the internal jumpers built into the switch.  Again I held my breath and made a single cut through the crosstie that I suspected would surround said jumper, then hooked up the buzzing device.  Nothing…as in success!  Such a rookie mistake.  I had failed to note the internal jumpers (visible from the underside of the switch) before gluing it down.  It also happened to be the last track assembly that I had installed.

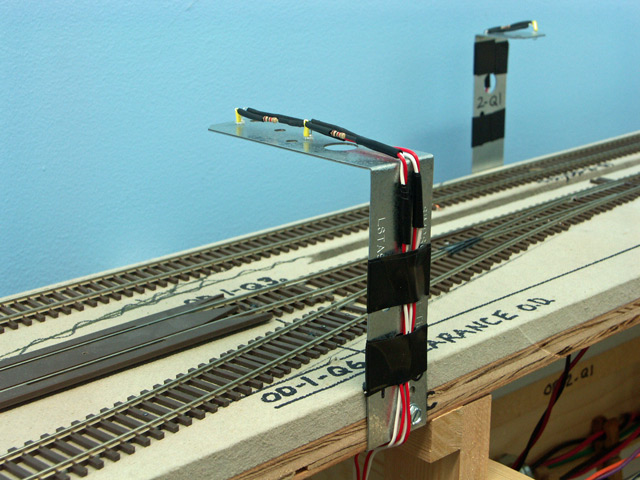
I carefully reconnected all the feeders throughout (with the sound maker hooked up), then set about repairing all the damage I’d done to the track during my trouble shooting.  Fortunately I was able to slide those shortened rail joiners back onto the mating rails, then soldered everything to keep it in place.  The initial cut at the crossing was aligned with the aid of a couple tiny brads driven into the roadbed (they’ll have to be painted over or otherwise concealed later), then all soldered.  A piece of styrene was inserted into the severed crosstie to keep the gap from closing.  And finally, I had to run a wire jumper to the short, now isolated rail at the offending switch and connect it to the barrier strip below.  I reconnected the track power, and hit the master switch.  Success!, the fault light was out and the Alco on the siding burbled to life.

I won’t be doing anymore track or electrical work without my buzzer connected.

-Jack

A New Drill Press (and other ramblings)

What with all the functions and family things going on at this time of year, I’ve scarcely had time to do anything of great magnitude out in the train room for several weeks now.  I have however, managed to pick away at lots of little things.  I thought I’d post this quick update of what’s going on.

I’ve mentioned a couple times that I needed to start modifying all of my Shinohara code 70 switches to be “DCC friendly”.  I have about 40 or so of these things to work on, and trackwork has come to a grinding halt until I get some of them done.  A drill press should make the task considerably easier.  I’ve had a large floor model press for years, however it simply has too much run-out in the chuck (or perhaps the arbor) for it to be of use with tiny wire size drills.  So I ended up purchasing a small table-top model that I think will be better suited to the task.  Upon arrival and assembly, the first realization was that I didn’t have anything suitable to sit it on out there in the train room.  So I cobbled together a small table from scraps, slapped a coat of paint on it, and now have a stout, compact place to operate the press on.  I chucked a pin vise adapter into the machine and inserted a number 70 drill bit.  I’ve only run it for a minute or so and haven’t drilled any holes yet, but I can tell the bit is running much truer than it would have in my large floor press.  Hopefully I’ll be able to start work on the switches soon.

Wayne Robichaux came over to lend a hand and we’ve installed the first 15 feet of fascia to the layout edge.  It sure makes a difference in the appearance, with even Wayne remarking how it made the layout look like a real layout (whatever that means….).  Nah, just kidding, I know what he’s getting at….even unpainted, it adds a nice finished look to the edge.  We will install perhaps another 20 feet or so along the mainline between Willis and Maynard.  I’ll hold off installing it in other areas until all track is down and wired, and the switch motors are installed.

I keep crawling under the layout to connect more track feeders to the power bus.  I’m connecting feeders to each switch and to almost every length of flex track.  That’s producing a LOT of feeders.  The only track sections without feeders are those soldered to an adjacent section that has a feeder.  I hope this pain now will be rewarded years down the road with good, dependable electrical performance.

I’ve another half dozen minor tasks that I’ve completed, but this post is becoming long-winded, so I’ll spare y’all the details.  Now that I have some fascia applied, I can begin installing some of the fascia mounted items such as throttle plug-ins and switch panels.  I’ll also have car card boxes, work shelves and a few other odds and ends on the fascia, but those will come much later when we are nearing operation.

I’ll post a photo or two in the next week or so when we finish the fascia project.

I’d like to wish all of you a very Merry Christmas and a great New Year!

-Jack

Optical Detection Explained

Well, there I go again.  Earlier I posted a column celebrating the completion of all the hardware and wiring for my optical detection system (well, it’s not really complete….I still have to build the panels that will display the occupancy indicator LEDs).

Problem is, I just assumed all readers would know what I was talking about.  Not!  I’ve been informed that I should quit assuming.

So, I’ll try to explain in 3000 words or less, just what an optical detection system is.  Now keep in mind that my explanation here is strictly in the context in which I am employing said detection system.  And I will avoid getting into the directions that the electrons are traveling and the gory details of the circuitry that makes this all happen.

I have six staging tracks, all of which are hidden from normal viewing.  In order to ascertain where a train is while running on this track, I decided to employ a detection system.  There are several ways to detect a train, and I chose to employ optical detection.  The system utilizes photo-transistors (PTs) which can sense whether or not they are seeing light.  When they do, they will turn on, that is, they act as a switch and will close a circuit.  I have installed my PTs centered in the track between a pair of ties, with their tops just above the roadbed.  The PTs are wired to a circuit board located under the layout.

As a light source, I’m using infrared LEDs (IR-LEDs).  To avoid seeing light beneath the layout, and to make the circuit less susceptible to ambient lighting, I chose to use components that are sensitive to light in the infrared range.  This isn’t visible to the naked eye, and in fact, that’s what most TV remote controls use.  The PTs and the IR-LEDs selected are matched to their light spectrum and work in harmony together.  The IR-LEDs are mounted on the “towers” I spoke of in the last post, and are pointed down at the PTs.  They are simply wired to a 12 volt DC bus (a pair of wires).

The circuit board I mentioned above is the “brain” of the system.  The inputs to the board are the PTs.  The outputs are to plain old red LEDs which are used as indicators, installed on a simple panel with a track diagram.  Each indicator LED is placed on the track diagram at the location where a PT sensor is located on the actual track.

With the power on and the IR-LEDs shining brightly, the PTs see the light and the circuit board determines there is nothing out there as no PT is “closed”.  Therefore, no power is supplied to the indicator LEDs on the panel.  But when a train comes along, it blocks the light of an IR-LED shining on a PT below, and that PT turns on, which in turn lets the circuit board know that something is at that location.  It in turn lights up the appropriate panel indicator LED and you now have a visual indication of where the train is.

Simple, huh?

Actually, it really is.  I purchased the circuit boards already built up from a fellow hobbyist up in Canada.  All I had to do was install the PTs and IR-LEDs, and wire them up.

Your test will arrive in the mail later in the week.

-Jack

Optical Detectors Installed

I can hardly believe it myself.  I’ve completed the installation of all 24 of the photo-transistors (herein known as PTs) and their accompanying infrared LEDs (IR-LEDs) as used in my optical detection system.  Whew, what a job!  Nothing about the project was particularly difficult…at least not on paper.  The premise was simple, the wiring was simple, the hardware was simple.  But the effort to do each task wasn’t trivial, and the collective effort expended was nothing short of colossal.

Installing the PTs was by far the fastest and easiest thing to do.  Simply drill a 3/16″ hole and stick the PT into it.  Didn’t even have to secure them…they are held by friction.  I then ran a 26 pair phone cable around the layout and tapped into it with the PT leads, each PT on it’s own circuit.  The cable ends at a backboard beneath the layout where the circuit cards are located.  I made the tie-ins and the detection circuit was complete.

The IR-LEDs required much more effort.  The IR-LEDs are used as the illumination for the PTs.  I chose to install these up over the track, with the LEDs pointed down over the PTs.  I ended up fabricating a “tower” for each IR-LED.  In fact, I actually fabricated three types of towers as required by different installation requirements.  Using flat metal framing straps procured from Home Depot, the fabrication involved was drilling a couple holes, making some bends in the metal, then installing the towers onto the benchwork.  Later I made up some assemblies, each consisting of an IR-LED, a current limiting resistor, and some wire leads.  I installed these on the towers, ran the leads down below the sub-roadbed, and attached them to the 12 volt DC bus.

Today I applied the power, checked that each IR-LED was in fact illuminated (had to use my digital camera for that since you can’t see light emitted from them with the naked eye), then rolled a boxcar through all the “traps”.  All worked perfectly with no adjustments required!

Here’s a photo of a couple of the towers.  The one in the foreground is a double tower, in that it supports two IR-LEDs (one over each track).  If you go over to the main website, I have photos of all three types.

IR-LED Support TowerThere is one final task to do before the system is operational, and that is to build three small panels which will contain track diagrams with red LEDs located at appropriate locations.  This will be the visual indication to the engineer as to where his train is on the hidden staging track, and most importantly, when to stop.  I  need to install the fascia before building and installing the panels, so that task will be a ways down the road.

But having the hardware installed over the staging tracks clears the way for me to start the sub-roadbed and trackwork for the upper level above.

Progress is surely sweet!

-Jack

Assaulting Homasote Joints

Regular readers will recall the disaster I incurred in my attempt to use a belt sander for tapering roadbed and truing joints between Homasote sheets (Banning the Belt).  In laying the sub-roadbed for Monterey, which is essentially a Homasote tabletop, I was faced with three wide joints with a significant mismatch in height.  As I’ve mentioned several times, Homasote isn’t known for its consistency in thickness.  These height mismatches between panels were as great as a 16th of an inch…much too great to simply lay track, or even roadbed and track over.

Hand sanding large expanses of Homasote isn’t practical.  It just doesn’t sand like wood.  This past weekend I knew I had to get these joints matched up before track laying could commence.  So I tried another approach to the problem.  I had a Surform tool in my toolbox so I tried it out.  Surprise, it actually started shaving off the Homasote.  Now, it wasn’t pretty.  It actually grabs little chunks of Homasote and rips them out.  The tool clogged quickly, but a small stiff bristle brush worked well to clean it up.  I didn’t want to simply do a quick taper right at the joint, but rather I wanted a gradual taper of at least 3-4 inches in width.

Once I got it fairly close with the Surform tool, I decided to try my finish sander for the final sanding.  I attached some 50 grit paper (pretty coarse for a finish sander) and started working the surface.  This worked out much of the roughness created by the Surform tool.  I worked it for quite some time and ended up with a pretty decent taper and surface.

The final step was to smear a coat of drywall mud over the joint, building up from the formerly thinner side of Homasote up to the joint.  I’ll sand this down tonight and apply another coat.  After doing this two or three times, I should have a pretty decent joint between the panels and will be satisfied.

It was several hours of work, but in the end I think it’ll be worth it.  Did I mention the layer of fluffy dust over that area of the room to clean up?

On another note, I had intended to keep my electrical wiring current with the track laying.  But I’d let the wiring slip over these past couple months.  Surveying under the layout, I realized that there were about two dozen sets of track feeders that hadn’t been connected to the power bus yet.  I took the first step in installing the terminal blocks at each location (which serve as the interface/disconnect between the feeds and the bus), and I crimped spade lugs on all of the feeders.  Over the next weekend or two I’ll make taps into the power bus and run the heavy gauge taps to the terminal blocks.  My method, though tedious, works quite well and should result in dependable wiring that will also be easy to troubleshoot when necessary.

All in all, a pretty busy weekend especially since I was away from home most of Saturday.

-Jack

Those Optical Detectors

There are six hidden staging tracks serving the Louisiana Central.  Since the tracks are concealed from normal viewing, I decided to use optical detectors at each track to determine occupancy and the locations of trains.  Typically each track has two or three detectors near its end, and one at the entrance marking the fouling point.

Two of those staging tracks are in Monterey, one each for the IC and the T&P.  This weekend I completed the wiring for the photo-transistors and infrared (IR) LEDs, and their connections to the circuit board serving this area.  The fascia panel with the indicators isn’t built yet, so I soldered a couple leads to a red LED indicator and temporarily jumped it across the various output terminals for testing.  I’m happy to report that all the detectors worked perfectly without a single adjustment necessary.  This is somewhat a milestone in the electrical/electronics portion of the layout construction.  There are two more circuit boards over at the Willis side to handle the rest of the staging tracks.  I’ve got most of the photo-transistors already wired, but I need to get all the IR LEDs installed.  Benchwork for the Spencer logging operation can’t proceed until that work is done as most of the staging track is below that, and I want the system complete and operational before starting this new benchwork.

I had a busy weekend working on the layout.  In addition to the above, Wayne and I got the remainder of the sub-roadbed installed in East Monterey (not an official designation).  This area is around the corner from Monterey itself and will support the mainline entering town as well as a couple businesses.

I also got some roadbed laid near the end of the Monterey yard and I took care of a half dozen little tasks that I’d been putting off.  Overall, a good weekend.

Finally, my scheduled visit by a guest from Florida was cancelled due to some family health issues, but I got a semi-surprise visit instead from a co-worker, Van Thomas.  Van has been hearing about my construction for the past couple years and he decided to come over to see what this was all about first hand.  I think he enjoyed the visit, despite the hot and heavy construction going on during his stay.

-Jack

Clamping Down on Wires

Art Houston sent me an offline comment yesterday in which he mentioned drilling holes through the benchwork joists to act as wire raceways.  I responded to that with the method that I’m using for my wiring.  After thinking about it this morning, I decided I’d share my method with the rest of you.

When I erected my basic L-girder framework for the layout, I used a single “keeper” joist at each leg set location for the purpose of holding the L-girders in position.  As I’ve progressed with the sub-roadbed around the layout, I’ve added joists on approximately 16″ centers to support the risers and sub-roadbed.

Many modelers drill holes through their joists in which they then pull the wires for the various electrical circuits around the layout.  The problem I have with that is twofold: (1) I don’t have all the joists in place so that the wire can be pulled through. (2) Making changes to the wiring becomes more laborious if one has to pull wiring in or out of all those holes.

My solution was to create a series of hangers for the wiring.  For this I use simple EMT conduit clamps attached to the web of the L-girders.

Conduit ClampThese clamps are available in many sizes; I’m using both 1/2″ and 3/4″.  I buy them in boxes of 100 at Home Depot and they are relatively inexpensive in that quantity.  I use a single 3/4″ hex head sheet metal screw to attach the clamp, oriented in a vertical position, with the screw at the bottom.
Sheet Metal ScrewI like these screws as I can drive them into the soft pine wood, using a nut driver, without first drilling a pilot hole.

Generally I space the clamps about 12″ apart, with additional clamps located where needed.  I am running my power buses at the back L-girder near the wall, and my control buses at the front L-girder near the aisle.  I also have some special wiring in a couple locations for the optical detectors on the staging tracks.  This is a 25 pair telephone cable that I’m suspending in it’s own set of 1/2″ conduit clamps attached to the bottom of the joists.  I’ve already had to make changes in that wiring and the clamps made it a snap.  Merely loosen the screw at the clamp and slip the wire in or out, then re-tighten.

While not very high tech, this method has served me well on my last couple layouts.

-Jack

Train Day at the Library

This upcoming Saturday, January 18th, will see the second annual Train Day at the Library event over in Baton Rouge.  The main features of the event are the numerous railroading slide presentations.  There will be a number of other displays hosted by a couple local model railroad clubs, the Southeast Louisiana chapter of the NRHS, a few individuals and of course, the Operation Lifesaver display presented by a couple of the railroads in the area.  The event will be at the Jones Creek branch of the library, located at 6222 Jones Creek Road in Baton Rouge.  The show opens at 10:00 am and runs until about 4:00 pm.  Hope to see a few of y’all there!

A bit more progress has ensued on the layout.  I have the infrared LEDs installed and wired up at Monterey (these are the light sources for the optical detectors recently installed).  The final track bus run for the second booster district has been installed and connected, leaving only the third (and final) booster district to wire.  I even got a start on the trackwork at the east end of the Willis yard and hope to continue that next weekend.

As most of you folks reading this know, Lou Schultz is still struggling with his foot issue, along with low oxygen levels.  I miss going over to his place for the operating sessions, and seeing him and the other guys in the group.  Please keep Lou in your prayers for his recovery.

And finally, there is a fellow up in Canada that is building a nice layout which he calls the Port Rowan.  It’s a model of a Canadian National branch line set in the 1050s.  Trevor Marshall is his name and he regularly posts updates with photos, along with other trivia to his blog.  I admire his modeling skills and find his blog entertaining, so I thought I’d pass along the link:  Port Rowan in S Scale .  Give it a look.

-Jack

October Happenings

Well, benchwork and trackage have taken a back seat for the past 6 weeks or so.  I’ve been dealing with some medical issues and am having difficulty doing many (most) tasks required in the layout’s construction.  But in spite of that, I’m still doing things as I can each weekend.

I managed to get about two-thirds of the optical detectors installed prior to my troubles.  In recent weeks I’ve installed a bit of roadbed at the Willis yard and I’ve made very good progress on my control panel designs.  I plan to have approximately 15 control panels around the layout.  Two of them will be for the yards at Monterey and Willis, and the rest will be “mini-panels”, typically 5″ high x 8″-10″ wide.  These smaller panels will be at the various towns along the line and will contain track plan snippets along with switch position indicators (LEDs) and the toggles used to control the Tortoise switch machines.  A few of them will be used for the hidden staging tracks, with the LED track occupancy indicators giving the engineer visual cues as to where his train is.

I’ll be using the tried and true “sandwich” method of panel construction.  I’ll sandwich a print-out of the appropriate plan between a piece of 1/8″ Masonite and some 0.1″ acrylic plastic.  Next drill the holes for the toggles and LEDs, install and wire same, then mount the panel to a box or directly to the fascia.  I used this method on my last layout and was quite pleased with the result.

Over the past month I ordered all the electrical components I’ll be needing from Jameco Electronics, so I’m now ready to build a mock-up of a panel.

I’ve also been acquiring several other items and materials that I’ll be needing so as soon as my health issues are resolved, I can get back to the heavy-duty construction.

We’re also getting into that time of year where all sorts of railroading events take place.  The calendar is already starting to fill out with planned activities.  I hope to see some of you folks at some of these.  The only event that is still missing is a good train show with vendors.  It’s a shame we aren’t on the regular circuit for one of those.

Any questions or comments?  Please post or drop a line…I like hearing from you.

-Jack

Second Time’s the Charm

If you are regularly following this blog, you’ll recall the comedy of errors I committed while installing the wiring for the optical detectors a few weeks ago.  I mentioned in that post that I’d decided to rip everything out and start over.

This past weekend I did finish ripping out the old work and I completed the new and improved wiring installation for the phototransistors in the west staging area.  The results were much better than my original efforts.  Armed with the success, I will now repeat the lessons learned over at the east staging area (which is twice the size).

I also have to put in the illumination for all those PT’s.  I’ll be using infrared (IR) LEDs attached to overhead supports, one over each PT.  I have no specs for the IR LEDs that I have, so I’m going to have to assume their characteristics in order to select the current limiting resistors that will be required.  I’ve never worked with IR stuff before, but I’m told that if you look at an IR LED that is turned on through a digital camera, that you can see the light.  I hope that is so, as I think aiming and adjusting will be much more difficult if I can’t even see what I’m trying to do.

Plenty of other things have occurred over the last couple weeks, though mostly things that don’t really show any progress.  I finished installing all the cable hangers for the main cable runs throughout all of the benchwork (a significant task itself).  I finalized what control panels will be required and their locations.  I’ve even started some preliminary drawings for panel layouts.  I’ve coordinated where other things will be on or under the layout’s fascia once it’s installed, particularly the work shelves and throttle plug-ins.  I’ve got the Willis yard ready for track installation now.  I keep a marker board filled with a running list of tasks that need to be done, and I manage to erase a couple each weekend.

I’ll likely be doing wiring for at least several more weeks before moving back to the roadbed and track.  But I figure it’s good to try keeping the electrical and roadbed/track current with each other.

Most of you that are subscribers to this blog are relatively local, so if you’d like to visit to see things for yourself, you’d be more than welcome.  Just drop me a line, and we’ll make it happen.

-Jack